
When disaster strikes, every second counts. Imagine needing to evacuate your home at a moment's notice and realizing that your emergency supplies are buried somewhere in a cluttered closet or spread across multiple locations.
This scenario is all too common, leaving many unprepared when it matters most. Storing your 72-hour kit for fast, easy access can be the difference between a seamless evacuation and a chaotic scramble.
Proper organization ensures that you and your family can grab essential items swiftly, without the added stress of searching through piles of belongings.
In this blog post, we’ll delve into practical strategies for effectively storing your 72-hour kit, ensuring that you’re always ready to face unexpected situations with confidence.
From choosing the right containers and locations to clever labeling techniques, you'll discover how a few simple changes can dramatically improve your readiness.
Whether you live in a flood-prone area or simply want peace of mind knowing you're prepared, this guide will help you organize your emergency supplies efficiently, so you're always ready to act.
Selecting the Ideal Containers for Your 72-Hour Kit
Choosing the right container is the foundation of How to Store Your 72-Hour Kit for Fast, Easy Access. Your container must be durable, weather-resistant, and easy to carry at a moment’s notice.
Hard-sided plastic totes with locking lids offer excellent protection against moisture and pests, while military-grade duffel bags and tactical backpacks often feature reinforced stitching and abrasion-resistant fabrics.
For families, it may make sense to have a combination of one large bin for bulk supplies and individual backpacks for each member, ensuring that everyone can grab their personal items and go.
Size and weight are equally important. You want a container that holds all your essentials without becoming too bulky or heavy. Transparent bins allow you to see contents at a glance, reducing search time, but opaque options can hide supplies from prying eyes.
Consider quick-release buckles, ergonomic handles, and backpack straps for easy transport. If you live in a flood-prone area, elevate your kit in sealed waterproof containers or choose dry bags designed for outdoor enthusiasts.
The goal is to strike the perfect balance between capacity, accessibility, and protection so your emergency supplies remain intact and ready to deploy whenever disaster strikes.
Designating Accessible Storage Locations in Your Home
Storing your 72-hour kit in a single, well-chosen spot can mean the difference between a calm evacuation and a frantic search. Ideally, place your kit near a primary exit—such as a garage door or main hall—where you can reach it in under 30 seconds.
Avoid basements or attics that require navigating steps or ladders, which may become impassable during an emergency. If you have more than one exit, consider keeping matching kits near each one to ensure coverage.
Family members of different ages or abilities should be able to locate and lift the container without assistance. Label doors or entryways with discreet signage pointing to the kit’s location, and practice evacuation drills—especially with children—to build muscle memory.
If space allows, store a copy of your kit in a secondary location like a bedroom closet, ensuring that anyone stuck upstairs or away from the main exit also has quick access. The key is obvious, unobstructed placement that becomes second nature in any crisis.
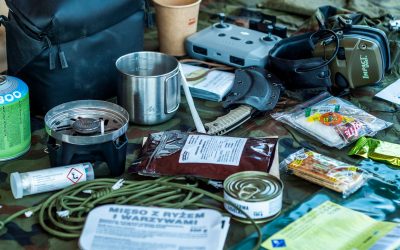
Implementing a Rotation System for Perishable Items
Perishable supplies—water, food, medications—must be regularly rotated to maintain freshness and effectiveness. Without a system, you risk expired rations or unusable medical supplies when you need them most.
Establish a schedule, such as every three months, to inspect and replace items nearing their expiration date. Use a simple spreadsheet or printed checklist to track purchase dates and shelf lives.
Organize perishables by best-by date: position the newest items at the back and the older ones at the front (FIFO: first in, first out). Label each item with its addition date in permanent marker or on a waterproof tag.
When restocking, remove and consume the oldest items during your next camping trip or family gathering. This approach not only keeps your kit fresh but also prevents waste by integrating emergency supplies into everyday life.
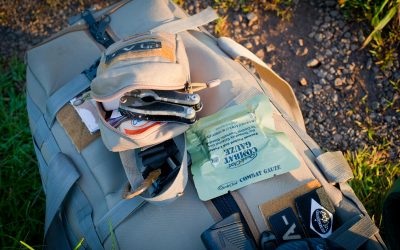
Securing Important Documents within Your Emergency Kit
Vital records—passports, birth certificates, property deeds, insurance policies—should be stored in a waterproof, fire-resistant pouch inside your kit. Use acid-free plastic sleeves or sealed envelopes to guard papers against moisture and tearing.
Keep both originals and color-copied backups in separate, clearly labeled compartments. If possible, place digital scans on an encrypted USB drive or microSD card wrapped in waterproof tape.
Consider cloud storage as a supplemental safeguard, but never rely solely on internet access during a disaster. Store login credentials and decryption keys on paper in the kit, ensuring you can retrieve digital files if connectivity is restored.
By centralizing all your critical documents in one secure container, you simplify decision-making and paperwork when time is of the essence.
Utilizing Clear and Concise Labeling Methods for Quick Identification
Well-designed labels speed up visual searches and minimize mistakes under stress. Invest in waterproof label makers or durable vinyl tags and write in large, bold fonts.
Color-code containers by category—blue for medical supplies, green for food and water, red for tools and gear. Use pictograms or simple icons for non-readers and children.
Attach an inventory list to the inside lid of your main container, detailing item names, quantities, and expiration dates. Update this list each time you rotate supplies.
For smaller pouches or boxes, affix tamper-proof seals that break with a clear “opened” indicator. That way, you always know if someone has accessed or disturbed your kit without your knowledge.
Incorporating Emergency Contact Information in Your Kit
Your kit should include a laminated card listing phone numbers, addresses, and meeting points for family members, neighbors, doctors, and emergency services. Place one card in each backpack or pouch and post an extra copy on your fridge or family bulletin board.
For older relatives or guests, add simple instructions on how to operate communication devices or radios. Additionally, consider programming ICE (In Case of Emergency) contacts into every family member’s mobile phone.
Store pre-paid calling cards or a solar-powered charger in your kit to ensure you can reach out even if power and cell towers are down. Having both digital and paper copies of contact information guarantees you remain connected when you need it most.
Creating a Checklist to Ensure Nothing is Left Behind
A comprehensive checklist is your final security blanket before departure. Divide it into sections—food, water, first aid, tools, clothing, documents—to ensure every category is covered. Print multiple copies and laminate them to withstand wear and tear.
Attach one checklist to the outside of each container and keep spares on your fridge or in your glove compartment. Regularly tick off items as you inspect and rotate your kit. If you add or remove supplies, update all copies immediately.
Encourage each family member to carry a personal checklist, so even if the main kit is buried, individuals know exactly what to grab. This simple habit will greatly reduce the risk of forgetting critical items in the heat of the moment.
Regularly Reviewing and Updating Your 72-Hour Kit
Scheduling quarterly or biannual reviews ensures your kit evolves with changing needs. Use calendar reminders to inspect supplies, check expiration dates, and assess whether the container and storage location remain optimal.
Involve your entire household in review sessions—assign each person a category to inspect and report back. Life changes—new babies, aging parents, dietary restrictions, pet additions—require kit adjustments.
After every family update, relocation, or major event, revisit your list and supplies. Performing practice drills and debriefs helps identify gaps you may have overlooked. By committing to regular maintenance, your 72-hour kit remains a reliable resource you can trust without hesitation.
Maximizing Space Efficiency in Your Storage Areas
Optimizing every inch of storage ensures your kit doesn’t encroach on daily living space while remaining instantly accessible. Use stackable, clear bins to keep supplies visible and organized. Vacuum-sealed bags compress clothing and blankets, freeing up volume.
Smaller items like batteries, first-aid materials, and hygiene products can be grouped in modular pouches that fit neatly into larger containers. If floor space is limited, install sturdy shelving units in a closet or garage corner.
Label each shelf by content type so you can quickly locate what you need. Magnetic strips on the wall can hold tools or metal utensils, and pegboards accommodate items with hooks. Even under-bed storage drawers can house secondary kits.
By thinking vertically and compartmentally, you preserve living areas while ensuring every tool and supply has its place at the ready.
Prioritize Accessibility and Preparedness for Peace of Mind
Storing your 72-hour kit effectively means planning, organization, and regular upkeep. By choosing the right containers, designating obvious storage spots, and implementing rotation systems, you ensure your supplies are fresh and reachability is instantaneous.
Labeling clearly, maintaining critical documents, and keeping up-to-date checklists and contact lists make a chaotic situation manageable. With periodic reviews and smart space management, you’ll always be ready to act decisively. Prioritize accessibility and preparedness now to enjoy peace of mind when every second counts.


0 Comments