
In this blog post, we’ll delve into practical strategies for optimizing your kit’s storage, ensuring that each item is within reach when you need it the most. From selecting the right storage containers to deciding the best locations in your home or vehicle, the way you store your 72-hour kit is as crucial as the contents themselves. By the end of this guide, you'll be equipped with actionable insights to transform your preparedness strategy, providing peace of mind for whatever challenges come your way.
Choosing the Right Storage Containers
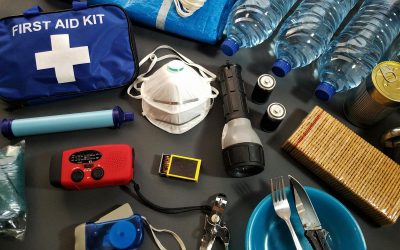
Your choice of storage containers is the foundation for How to Store Your 72-Hour Kit for Fast, Easy Access. The ideal container should be durable, weather-resistant, and appropriately sized to hold all essentials without becoming unwieldy. Hard plastic totes with secure latches are a popular option because they’re lightweight, affordable, and stackable. Look for containers rated as watertight and crushproof, ideally with an IP rating or similar specification.
For medical supplies or electronics, consider waterproof Pelican-style cases with customizable foam inserts to keep items protected and organized. Another consideration is modularity. Using a combination of smaller containers within a larger bin can help you group related items—first aid, tools, hygiene supplies—so you can grab just what you need without rummaging through the entire kit.
Transparent plastic containers allow you to visually confirm contents at a glance, while opaque totes can be labeled clearly on the outside. Don’t overlook the importance of a sturdy handle or wheels if your kit exceeds a reasonable carrying weight. Ultimately, selecting containers that balance protection, size, and portability will ensure your 72-hour kit remains accessible and intact in any situation.
Organizing Items by Priority
When learning How to Store Your 72-Hour Kit for Fast, Easy Access, organizing items by priority is essential. Start by categorizing your supplies into life-sustaining items, medical necessities, tools and equipment, and comfort items. This tiered approach ensures the most critical supplies are always at the top or in the most accessible compartment.
Within each category, arrange items in the order you’re likely to use them. For example, place your water purification tablets and emergency blankets near the top of the life-sustaining section, followed by energy bars and water pouches. In the medical section, keep your first-aid manual and basic wound-care materials at the forefront, with specialty medications and bulkier items deeper within the bin. This streamlined organization prevents wasted seconds during high-stress scenarios and enables you to retrieve vital items in a methodical, efficient manner.
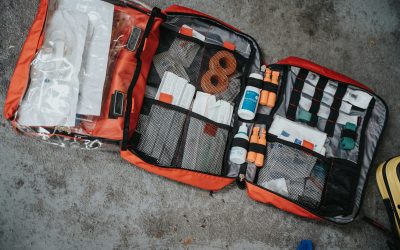
Labeling for Easy Identification
Clear, consistent labeling is a simple yet powerful strategy for ensuring you can locate supplies at a glance. Use weatherproof adhesive labels or a label maker to identify each container’s contents clearly. Color-coding is especially effective: assign a distinct color to each category—red for medical, blue for water and food, yellow for lighting and communications—and use matching tape or labels. This visual cue helps you immediately zero in on the right container, even under low-light conditions.
In addition to external labels, include an inventory sheet within each container. This list should itemize every supply along with expiration dates and replacement reminders. Laminating the sheet or placing it in a plastic sleeve will protect it from moisture. By integrating clear labels and an internal checklist, you minimize confusion and speed up the retrieval process—key components of How to Store Your 72-Hour Kit for Fast, Easy Access.
Rotating Perishable Items
Maintaining the freshness and reliability of perishable supplies—such as food, water, medications, and batteries—requires a systematic rotation process. Establish a “first in, first out” routine: when you add new items to the kit, move existing items to the front, and place newer ones at the back. This ensures you use older supplies before they expire, and you’re never caught with outdated provisions.
Keep a log of expiration dates on your inventory sheet and set quarterly reminders to review and replace items as needed. For medications, check manufacturer guidelines for proper storage conditions and shelf life. Similarly, test batteries every six months to confirm they still hold charge. By proactively rotating perishables, you uphold the integrity of your kit while reducing waste and guaranteeing readiness.
Securing Your Kit for Mobility
In emergencies, your kit may need to move with you. Whether you’re evacuating on foot or in a vehicle, your storage solution must be both secure and portable. Consider transferring the contents of rigid bins into a durable backpack or tactical duffel fitted with padded straps and multiple compartments. This setup lets you carry essential supplies comfortably while keeping items organized and easily reachable.
If you prefer to keep a dedicated tote, fasten it inside your vehicle using bungee cords, cargo netting, or built-in tie-down points. This prevents the tote from sliding around or toppling during transit. For rapid deployment, label exterior grab handles in bright, contrasting colors. Should you need to leave your vehicle quickly, you’ll be able to seize your kit without fumbling. Ultimately, securing your 72-hour kit for mobility ensures you remain prepared—whether you’re hunkering down at home or on the move.
Finding the Ideal Location at Home
Choosing the right spot in your home is crucial for quick access to your 72-hour kit. The ideal location is near a primary exit—such as a garage door, front door, or mudroom—so you can grab your kit on the way out without retracing steps. Avoid basements and attics that may become inaccessible during flooding, power outages, or smoke-filled conditions. Instead, select a ground-floor closet or utility room that remains easy to reach under various scenarios.
Beyond proximity to exits, consider environmental factors. Keep your kit away from direct sunlight, heaters, or damp corners that could degrade supplies. A cool, dry environment extends the shelf life of perishable items and prevents mold or corrosion. If space is tight, designate a multi-purpose hall closet or under-stair storage area exclusively for emergency preparedness. Clearly label the exterior so every household member knows its location, reinforcing your collective ability to respond swiftly when needed.
Creating Redundancy in Storage Locations
Having a single 72-hour kit is helpful, but redundancy takes your preparedness to the next level. Store secondary mini-kits—containing essentials like water pouches, energy bars, and basic first-aid items—in strategic spots: your vehicle’s trunk, your workplace desk, or a trusted friend’s home. This distributed approach minimizes the risk of being without supplies if your primary kit is inaccessible or damaged.
Make sure each kit is tailored to its location. For instance, your car kit should focus on roadside emergencies—jumper cables, flares, blanket—while your office kit might emphasize non-perishable snacks, bottled water, and personal hygiene items. Keep a master inventory list of all your storage points, updating it regularly to confirm each kit remains fully stocked and current. Redundancy not only safeguards against single points of failure but also boosts confidence that you can access crucial supplies no matter where you find yourself.
Weatherproofing Your Storage
Extreme temperatures, humidity, and moisture can compromise your kit’s contents—especially electronics, documents, and food items. To shield against the elements, choose containers with airtight seals and waterproof gaskets. Adding silica gel packets helps absorb ambient moisture, while desiccant canisters protect against condensation buildup. If you expect subfreezing conditions, store batteries and electronics in insulated cases to prevent cold-weather drain.
For outdoor or garage placement, consider elevated shelving or sturdy pallets to keep your kit off cold, damp floors. Wrap containers in UV-resistant covers to guard against sunlight damage. If you live in hurricane- or flood-prone regions, mount your kit on wall brackets above likely flood levels. By weatherproofing your storage, you’re proactively preserving the functionality and longevity of every item—essential for ensuring your 72-hour kit remains ready when disaster strikes.
Regularly Reviewing and Updating Your Kit
Even the best-organized kit loses its value if supplies expire or conditions change. Establish a regular review schedule—every three to six months—to assess and refresh your 72-hour kit. During each review, check expiration dates on food, water, and medications, replace used or outdated items, and update inventory lists. This disciplined maintenance ensures you maintain an accurate understanding of your kit’s readiness level.
Also account for changes in personal circumstances: new family members, dietary restrictions, or shifts in medical needs. Add or remove items accordingly, and conduct a practice drill to verify that each household member can locate and deploy the kit swiftly. Document lessons learned—such as missing items or cumbersome packing—and refine your storage strategy over time. Consistent review and updates transform your kit from a static collection of gear into a dynamic tool for genuine preparedness.
Conclusion
Storing your 72-hour kit effectively is about more than just stacking supplies in a closet—it’s about strategic planning, clear organization, and ongoing maintenance. By choosing the right containers, prioritizing item placement, and weatherproofing your setup, you ensure every essential is at hand when time is of the essence.
Whether you’re learning How to Store Your 72-Hour Kit for Fast, Easy Access or creating redundancy across multiple locations, the steps outlined here will help you respond with confidence and clarity during any emergency. A well-maintained, easily accessible kit transforms preparedness from an abstract concept into a practical reality. Stay vigilant, review regularly, and stay ready for whatever comes your way.


0 Comments